 |

Ideas
This page is reserved for examples of great projects
you can do with your materials.
I will be having monthly crafting contests with the
winner receiving more crafting items!! YIPPEE!
|
|
|
Walnut Hollow
|
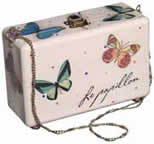
Butterfly Purse Box
Instructions:
Supplies:
Walnut Hollow® #23906 Creative Versa-ToolTM
Walnut Hollow® #1253OP Roomy Box
Walnut Hollow® #18018 Button
Color laser copies of various butterflies
Black and White laser copies (reverse image) of
"Le papillon"
1 gold latch
2 gold hangers
Gold beaded chain with connector
Butterfly charm
White Acrylic Paint
Paint pens of various colors to correspond with
color of butterflies
Craft glue, foam brush, paper towels, pliers,
ruler, sandpaper, satin spray varnish, tack
cloth, tape
Before starting project, read all
instructions on Creative Versa-ToolTM. Follow
all safety precautions.
Practice on an old piece of wood before
beginning project.
Instructions:
1. To prepare wood, lightly sand with
fine sandpaper. Remove dust with tack cloth.
2. To paint box and four wooden buttons, apply a
wash (1 part paint to 1 part water) with foam
brush. Remove excess paint with a paper towel.
Let dry.
3. To transfer butterflies refer to photo for
placement. Attach Transfer Point to Creative
Versa-ToolTM. Tighten with pliers. Tape stand to
work surface. Place Creative Versa-ToolTM on
stand. Let heat for 4-5 minutes. Cut individual
butterfly patterns, leaving at least 1" around
pattern to be transferred. Place laser color
image (image side down) on wood surface. Tape in
place. Use Transfer Point to apply heat in a
circular motion on image. Work quickly, lifting
corner of paper often to check progress of
transfer. Keep moving Transfer Point. DonÕt let
it stay in one place too long or it will burn
the wood.
4. Transfer "Le papillon" (reversed image) in
same manner as butterflies. Unplug Creative
Versa-ToolTM. Let cool.
5. To add dots, use paint pens of various colors
to correspond with color of butterflies.
Randomly dot with paint around butterflies and
words. Let dry.
6. Apply 2-3 coats of spray varnish.
7. To attach latch to close box, use ruler to
find center and follow packaging directions.
8. Refer to photo for placement. Attach a hanger
on two ends of purse.
9. To create shoulder strap, thread chain
through hangers and connect two ends together.
10. Attach butterfly charm to chain next to
hanger.
11. Use craft glue to adhere buttons on bottom
four corners. Let dry.
|
|
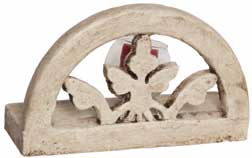
Styrofoam Votive Candle
Holder Instructions:
Supplies:
Walnut Hollow® #23906 Creative Versa-ToolTM
4"x8" Styrofoam®
BeaconÕs Foam FinishTM
Glass Votive Candle Holder
Antiquing Medium, craft stick, foam brush, glass
surface, metal ruler,
Off White paint, paper towel, pencil, pliers,
tape, votive candle
Before starting project, read all
instructions on Creative Versa-ToolTM.
Follow all safety precautions. Practice on an
old piece of Styrofoam® before beginning
project. A glass surface works well when using
the Hot Knife Point. The Hot Knife will get very
hot and will produce some smoke.
Work in a well ventilated room.
Instructions:
1. To create a pattern to carve, use a stencil
or draw a design onto paper. Use tape to secure
stencil in place. Use pencil to outline design
onto Styrofoam®.
2. Attach Hot Knife Point to creative Versa-ToolTM.
Tighten with pliers. Tape stand to work surface.
Place Creative Versa-ToolTM on stand. Plug into
electric outliet and let heat for 4-5 minutes.
3. To create an L shape base for carving, remove
a 3"X8" section of Styrofoam¨ from back leaving
the base 1" high and front 1" thick.
4. To cut pattern, use metal ruler as guide for
any straight lines. The Hot Knife Point cuts
very quickly, making arches easy to achieve.
Follow pencil lines until pattern is complete.
Cut hole in center of base to hold votive
candle. Unplug Creative Versa-ToolTM. Let cool.
5. To apply Foam FinishTM use craft stick.
Follow directions on label. Let dry. Apply
second coat if needed until a smooth finish has
been achieved.
6. To apply paint, use foam brush with Off
White. Let dry.
7. To antique, use foam brush to apply Antiquing
Medium over paint. Remove excess with paper
towel. Let dry.
8. Insert votive candle into center of base.
|
|
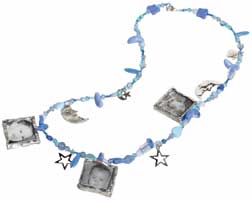
Beaded Charm Necklace
Instructions:
Supplies:
Walnut Hollow® #23906 Creative Versa-ToolTM
Artistic Wire® Silver 20 gauge wire
Small clear glass pieces (6-1Ó x 1Ó)
1/4" Copper foil tape
Black and White Photo or image copy
Beads and charms
1 yd. Waxed Linen Cord
Piece of glass to use as work surface
2" dowel or pencil, masking tape, moist sponge,
pliers, scissors, wire cutter
Before starting project, read all
instructions on Creative Versa-Tool\TM.
Follow all safety precautions. A glass surface
works well when using the
Soldering Point. Practice soldering before
beginning project.
Instructions:
1. Using masking tape, secure the Creative
Versa-Tool stand to the work table. (This keeps
the Tool safe and secure on the table.). Read
package directions for proper use and safety
before beginning. Using pliers, attach Soldering
Point to Creative Versa-ToolTM. Plug into
electric outlet.
2. Using scissors, cut images to fit glass
pieces.
3. Place images between glass pieces. Remove a
small section of adhesive backing from Copper
foil. With adhesive side up, hold all pieces
together and place outer glass edges in center
of copper foil strip. Carefully fold copper foil
around glass edge. With side of wooden pencil or
dowel, burnish edges of copper foiling to
smooth. Repeat for all sides.
4. "Tinning" the Soldiering Point is essential
for soldering as it helps the solder adhere to
the Point. To "Tin" the Point, apply solder to
the end of the Point. The Point will have a
brighter silver look to it when "Tinned".
Sometimes a Point needs to re re-tinned while
working on a project.
5. To coat foil with solder, touch Soldering
point to solder. Pick up a generous amount of
solder and apply a thin coating to all copper
foil. As the solder melts, move it slowly across
foil tape. Repeat process for front, back and
sides, until copper foil is covered. Using moist
sponge, pull solder point across OFTEN to clean
solder point.
6. Using wire cutters, cut 1/4" silver craft
wire. Bend into "U" shape. Using pliers to hold
wire U at top of stain glass, apply a droplet of
solder to each side to attach.
7. Using scissors, cut 36" of waxed beading
thread. Pull thread through silver wire loop on
middle glass piece. Thread random colors and
shapes of beads and charms on each side, adding
other glass pieces on each side of center as
desired.
8. Tie a square knot twice at the end.
|
|
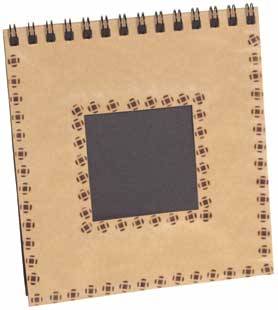
Stamped Paper Notebook
Instructions:
Supplies:
Walnut Hollow® #23906 Creative Versa-ToolTM
Faux Suede Memory Album
Pliers, Tape
Before starting project, read all
instructions on
Creative Versa-ToolTM packaging. Follow all
safety precautions.
Practice on an old piece of wood or cardboard
before beginning project.
Instructions:
1. Attach Square Stamp to Creative Versa-ToolTM.
Tighten with pliers. Use tape to secure stand to
work surface. Place Creative Versa-ToolTM on
stand.
Plug into electric outlet. Let heat for 4-5
minutes.
2. To create stamped border, hold Creative
Versa-ToolTM in an upright position and press
stamp onto edge of album opening. Continue
stamping around album
opening until border is complete.
3. Stamp around outer edge of album using the
same method described above until border is
complete.
|
|
Festive Cards
 |
Materials:
Walnut Hollow® #24422 Creative HotMarks™
Brass Stencil
Cardstock
Ribbon, colored pencils, paint pens, sparkle
paint, beads, lace, craft glue, pliers, tape
Instructions:
1.Read and follow all safety precautions
on packaging before beginning project. Attach
Tapered Point to Creative HotMarks™. Tighten
with pliers. Secure stand to hard surface with
tape. Place Creative HotMarks™ on stand. Plug
into electric outlet. Let heat for 4-5 minutes.
Practice on scrap of paper before beginning
project to get a feel for the tool.
2.Choose cardstock, any color desired.
Cut to approximately 4”x5” or 4”x4” depending on
shape of stencil. Use X-Acto knife and ruler for
straight edges.
3.Center brass stencil of your choice on
cardstock. Tape in place.
4. Use Creative HotMarks™ with Tapered
Point to outline stencil opening. Use a light
touch for a smooth effect. Unplug Creative
HotMarks™. Let cool.
5. Use craft glue to mount card on larger
folded cardstock to create a card.
6. Add color to card using a choice of
oil color pencils, glitter paint, paint pens,
ribbons, beads, lace, etc.
7. Torn paper with burned edges gives a
nice effect. To achieve this look, use Shading
Point attached to Creative HotMarks™. Hold
Shading Point against torn edges until shading
color is achieved. Follow safety instructions
mentioned above.
|
|
|
|
|
Right Column Box
 |
|
|
Headline |
|
|
|
Hours: O
P E N
O P E N
O P E N
We're here 24/7
It's going to be an exciting year! More items coming
in every day.
If you don't see what you wish, be sure to ask, I am glad to
special order items for you (and maybe carry them) just because YOU
ASKED!
My warmest welcome to my customers....I'm so glad you
stopped by. Be sure to grab a cookie as you shop....mine have no
calories! :)
Would you like to open a web store? Don't get stuck with a
solution that controls you. Ask and I'll direct you to an
easy, fun and reasonable solution!
|
|
|
|
|
