|

Ideas
This page is reserved for examples of great projects
you can do with your materials.
I will be having monthly crafting contests with the
winner receiving more crafting items!! YIPPEE!
|
|
|
Easy Cut Craft Punch All-in-One Directions
 |
| |
|
all-in-one, allDeco
Punch |
|
Instructions for CIRCLE
Punch or SQUARE Punch : |
1. Rotate lower plate to
the CENTER and align
each corner line A and
B. (as shown in drawing
1).
2. Place the paper on
the lower plate.
3. Place upper plate on
the paper lightly and
align ARROW with C and
allow the magnets to
lock. (drawing 2).
4. Readjust the paper
position gently as
needed.
5. After the 1st punch,
turn the plate 90˚to the
right or left until you
hear a click.
Make sure the ARROWS
align and then make your
2nd punch. (drawing 3).
Repeat the same
movements 2 more times
to get the completed
pattern
There should be a
total 4 punches.
(drawing 4).
|
| |
 |
| |
|
| |
|
Instructions for CORNER
punch : |
1. Position the paper
into the CORNER lines
(2 different sizes)
and punch (drawing 5).
|
|
|
| |
|
Instructions for BORDER
punch : |
1. Rotate the lower
plate 90 to the left
(drawing 6).
2. Insert the PRINTED
DESIGN GUIDER into the
left or right of the
lower plate base and
move the paper to the
right
or left the punched
design is aligned with
the PRINTED DESIGN
GUIDER which is included
in a plastic case.
|
|
|
|
|
|
|
Instructions for Design
Cartridge : |
1. Insert the design
cartridge into each
plate at about a 45˚
until it is locked.
2. To remove the design
cartridge from each
plate, lift them at
about a 45˚ by pushing
the button (see the
drawings) |
|
|
|
|
|
|
|
|
4-in-1, allDeco Punch
|
|
Instructions for 4-in-1
CORNER Punch : |
1. There are 4 corner
positions.
Insert the paper
into the desired
position (as shown in
drawing 1).
|
|
|
|
|
|
Instructions for 4-in-1
BORDER and CORNER Punch
: |
1. Insert the PRINTED
DESIGN GUIDER into the
left or right of the
lower plate base and
move the paper to the
right or left
until the punched
design is aligned with
the PRINTED DESIGN
GUIDER which is included
in a plastic case
(drawing 2). |
|
|
|
|
|
|
Instructions for Design
Cartridge : |
1. Insert the design
cartridge into the upper
plate vertically until
it is locked.
2. Insert design
cartridge into the lower
plate at about a 45˚
until it is locked.
3. To remove the design
cartridge from the upper
plate, lift it
vertically by pushing
the button.
4. To remove the design
cartridge from the lower
plate, Pull it at about
a 45˚ by pushing the
button. See the
drawing.
|
|
|
|
| |
|
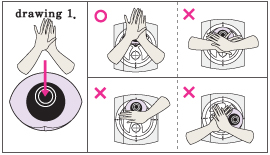
IMPORTANT |
|
Because
of
elaborate
cutting
designs
and
sizes,
it
is
essential
to
press
with
two
hands.
When
pressing
the
lever
with
two
hands,
apply
powerful
pressure
mainly
on
the
upside |
of rubber-made area
of the lever toward
the hinge as drawing 1. |

|
|
|
|
|
|
|
|
|
Tips & Tricks |
1. To ensure a crip
embossing effect, hold and
press the punch lever
firmly.
2. To remove the upper
plate and the lower plate
smoothly, it is recommended
to slide them, rather than
lift them. |
|
|
|
| |
|
|
|
|
|
Right Column Box
 |
|
|
Headline |
|
|
|
Hours: O
P E N
O P E N
O P E N
We're here 24/7
It's going to be an exciting year! More items coming
in every day.
If you don't see what you wish, be sure to ask, I am glad to
special order items for you (and maybe carry them) just because YOU
ASKED!
My warmest welcome to my customers....I'm so glad you
stopped by. Be sure to grab a cookie as you shop....mine have no
calories! :)
Would you like to open a web store? Don't get stuck with a
solution that controls you. Ask and I'll direct you to an
easy, fun and reasonable solution!
|
|
|
|
|