This page is reserved for examples of great projects
you can do with your materials.
I will be having monthly crafting contests with the
winner receiving more crafting items!! YIPPEE!
Ideas Page
Fly Fishing - Tie your own Flies!
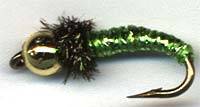
Caddisfly Pupae
Designed by Al Hafner
Materials Needed:
Hook: #12 - 16 Tiemco 2487,
Mustad 3906Thread: 6/0 Black
Body: Kreinik Fine or Medium Braid Caddis
Larva Green (015)
Head: 1/8 inch brass bead
Collar: Peacock Herl
Tying Directions:
1. Pinch barb down and slide bead on to eye.
The bead adds weight and make the fly drop
head first into the water. If using this fly
without a bead head, fish with a sink tip
line and a short leader.
2. Tie on the body material. If your using
Medium Braid: tie in at bend of hook, wrap
to head and tie off. If your using Fine
Braid: tie in at head, wrap to bend and
return to head, then tie off.
3. If desired, a collar can be tied in
between the bead head and the body braid,
using one strand of peacock herl. Tie off
and add head cement. This collar is needed
if a bead head is not used.
Emergent Pupa Version: Do not use a bead
head. Add a marabou or hackle collar to
simulate wings and legs. Add a small peacock
herl collar.
Other body colors often used for this
pattern are: Red (003), Emerald (009HL),
Copper (021), Brookie (034), Bronze (052HL),
and Mallard (850).
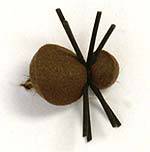
Disco Beetle
Designed by Harrison Steeves, III
Materials Needed:
Hook: Tiemco 2487, #8-12. This model hook
works better than a standard wide gape dry
fly hook for this pattern. The curvature of
the hook allows plenty of room between the
body and the hook point.
Thread: 6/0, color of choice
Body: Kreinik Foam Tying Disc 1/2" in color
of choice, Kreinik Foam Tying Disc 1/4" in
yellow or orange
Underbody: Kreinik Medium Braid in color to
match 1/2" Disc
Legs: Use either fine or medium round rubber
leg material in colors to either match or
contrast with the body color, or use Kreinik
1/8" Ribbon in (#850) Mallard to form wings.
Tying Directions:
1.) Wrap the hook shank with thread back to
a point just behind the eye of the hook. Tie
in a piece of Kreinik Medium Braid. Wrap the
braid to a point even with the bend of the
hook, and then wrap forward to where you
tied the braid in. Tie off, cut excess.
2.) Place 1/2" foam disc on top of the hook
shank with the front of the disc extending
just over the eye of the hook. About one
quarter of the disc should be extending
forward from the point at which the tying
thread is positioned on the hook shank. The
forward extending portion of the foam will
thus form the head of the beetle. The
remainder extending toward the rear, will
form the body of the beetle.
3.) Fold the foam disc evenly over the hook
shank and tie it down. At this point you
should have a good head and body formed.
Give it another ten or twelve tight wraps of
thread so the body will not turn on the hook
shank.
4.) Tie in the 1/4" disc at the same spot as
the 1/2" disc. This disc serves as your ez
viz indicator. A small amount of super glue
can be applied to the underside of the
finished fly if your fly bodies turn, but
tight thread wraps are usually all that is
necessary.
5.) Legs or wings can be tied in on the
sides of the body and trimmed to appropriate
length. I usually tie this beetle with wings
no longer or just slightly longer than the
body of the beetle. Once the legs or wings
are tied in, whip finish and remove thread.
Editor's Note:
This pattern is a modification of the
original Disc O’ Beetle featured in
"Terrestrials 101" written by Harrison
Steeves, III in the Winter 1996 issue of Fly
Fish America. The Disc O’ Beetle is also
available from Umpqua Feather Merchants.
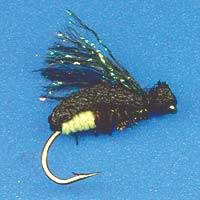
Firefly
Designed by Harrison Steeves
Materials Needed:
Hook: #12, 14,16: Tiemco 5212, Orvis 1638,
Mustad 94831
Thread: 6/0 Black or Orange
Wing Case: Kreinik 1/8” Ribbon; Black Hi
Lustre (Beetle Black) #005HL
Body: Orvis 1/8” thick closed cell black
foam, cut into 1/8” wide strips
Underbody: 3-4 strands of peacock herl
Butt: Kreinik Medium; Glow in the Dark
Lemon-Line (Yellow) #054F
Wing: Either 1/8” Kreinik Ribbon, or
Kreinik Heavy Braid; Mallard #850
Tying Directions:
1. Wrap first half of hook shank with
thread. Tie in wing case material (use
about a 6 inch piece) to the bend of the
hook (end of shank).
2. Wrap thread forward 2/3 length of hook
shank, tie in foam strip and wrap backward
to bend of hook, even with wing case
material.
3. Tie in butt material (about a 6” piece)
and wrap thread forward enough to allow two
to four wraps of butt material forward (two
on the smallest hook, and four or more on
larger fireflies). Wrap butt material
forward (3 wraps on a #14 hook), and tie
down on top. Trim off excess butt material.
4. Tie in 3-4 strands of peacock herl in
front of butt and wrap thread forward to
within about 1/8” of hook eye. Wrap peacock
herl forward and tie down. Trim off excess
herl. Wrap thread back and then forward
through herl for reinforcement.
5. Fold foam over and forward to form body,
tie it down about 1/8” back from the eye of
hook and trim to leave a head extending to
or slightly over the hook eye. Save excess
foam for more bodies.
6. Tie in winging material at the point
where the head and body join. Wings should
extend back no further than the butt. Trim
forward portion even with front of head.
7. Separate winging material evenly on both
sides of the body, fold wing case material
forward and tie down. Trim wing case
material even with front of head and save
excess for more flies. Whip finish.
Note: You can substitute brighter colors of
1/8” Ribbon for the wing case such as 051F,
052F, 053F, 054F or 055F. These colors will
make the fly easier to see in the water.
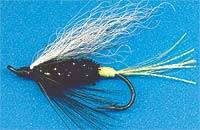
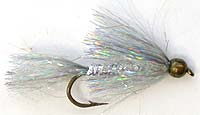
Green Butt Skunk
Modified by Ray Larsen
Materials Needed:
Hook: Salmon #2 - #8
Thread: 6/0 - Black
Wing: White Calf Tail
Tail: 10 strands of Kreinik Flash In A Tube™
in (#054F) Glow In The Dark
Yellow, or (053F) Glow In The Dark Green
Butt: 1 strand of Kreinik Flash In A Tube™
in (#054F) Glow In The Dark Yellow,
or (053F) Glow In The Dark Green
Body: Kreinik Micro Ice Chenille - (#005)
Black
Throat: 3-4 turns of folded black saddle
hackle
Tying Directions:
1. Start at the tail. Tie in about 10
strands of Kreinik flash so that they extend
about 1" past the bend of the hook.
2. After tying off the tail material, wrap
over the tailing material with the single
strand of Kreinik flash to form the butt.
After about 7 or 8 wraps, tie off flash.
3. Wrap you thread forward to a point about
1/4" from the eye of the hook. To form the
body of the fly tie in the Micro Ice
Chenille and wrap the chenille rearward, and
then wrap back forward and tie off at the
same point where you tied it in.
4. To form the throat hackle, tie in a
saddle hackle, and make two wraps.
5. To form the wing, tie in a clump of calf
tail on top of the hook at the same point as
the Micro Ice Chenille so that the calf tail
extends about 1/2" past the bend of the
hook.
6. To finish, tie off the calf tail, and
build up a neat head with your tying thread,
and coat with head cement.
Editor's Notes:
Ray Larson is a guide from Sheboygan,
Wisconsin. Most green butt skunk patterns
have a silver tinsel rib, but Ray says that
the black Micro Ice Chenille is so shiny,
the ribbing is not necessary.
Long Bridge Sally
Designed By Dave Schmezer
Materials Needed:
Hook: Mustad 79580 or 9672 : #6 - #12
Thread: 6/0 - Color to match
Head: Brass bead head of appropriate size
Tail: Clump of marabou with about 10 strands
of Kreinik Metallic Flash In A Tube™ in a
color to match the 1/6" Ribbon
Body: Kreinik 1/16" Ribbon - Caddis Larva
Green (#015), Black (#005), Star Yellow
(#091), Glow In The Dark Green (#053F),
Peacock (#085)
Collar: 3-4 turns of folded saddle hackle or
spey hackle on larger flies
Tying Directions:
1. Install bead head.
2. Begin tying thread behind the bead head,
wrap thread base rearward until several
turns before bend of hook, then return
thread forward.
3. Tie in marabou on top of hook shank,
leaving gap between the bead and marabou.
Marabou Marabou should extend 1-1/2 hook
gaps past bend. Be sure to trim the marabou
short of the bead head. You will need room
wind the hackle later.
4. Tightly wrap thread to rear just before
the bend, then return forward.
5. Tie in 8 to 10 strands of Kreinik
Metallic Flash In A Tube™ on each side. Wrap
thread to rear just before the bend, then
return forward.
6. Tie in Kreinik 1/16" Ribbon on top (still
leaving a gap for the hackle). Wrap thread
to rear just short of bend then, return
return forward.
7. Wrap Ribbon forward and tie off just
behind the bead. Add a drop of head cement
to lock the ribbon in, trim excess.
8. Tie folded saddle hackle in by the tip,
behind the bead head, with five or so tight
wraps.
9. Take three-four turns of hackle, stroking
the hackle back as you wrap. Tie off, secure
with several whip finishes and apply head
cement to wraps.
Editor's Note:
Dave says that you can tie this fly in
different colors and sizes to catch just
about anything that swims. I agree with
Dave. I have tied this pattern in Kreinik
Glow In The Dark Yellow color (#054F) to
catch Hickory Shad, and in Purple (#026) to
catch Smallmouth Bass.
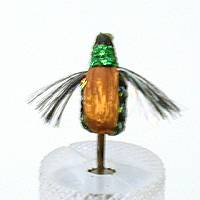
Sinking Japanese Beetle
Designed by Harrison Steeves, III
Materials Needed:
Hook: #10 - Tiemco 3769, Orvis 1641, Mustad
3906
Thread: 6/0 Olive or Green
Body: Kreinik Heavy Braid; Mallard #850,
Emerald #009HL
Wing Case: Copper colored Swiss Straw or
rafia
Wing: Kreinik 1/8” Ribbon; Mallard #850
Head/Thorax: Kreinik Fine Braid; Chartreuse
(Caddis Larva Green) #015
Tying Directions:
1. Wrap the rear half hook shank with
thread.
2. Tie in Swiss Straw, use about a 4” piece.
Tie in the Swiss Straw at the end of the
hook, almost to the bend of the hook. Wrap
thread forward to the middle of the hook
shank.
3. Tie in two 9-10” strands of Kreinik Heavy
Braid on each side of the hook shank. Tie
them down by wrapping the thread backward to
the same point at which the Swiss Straw
exits the wraps. Wrap thread forward to
about 1/16” behind the hook eye, half hitch
(or whip finish) and cut thread.
4. Form the body of the beetle by using the
overhand knot technique, passing the eye of
the through the middle of the knot. Tie so
that the 009HL strand form the back (top),
and the 085 strands forms the belly
(bottom). Use seven (7) knots to form the
body on #10 hook. This will assure the
proportions. When the body has been formed,
tie down both body strands of material and
cut. Note: When forming the knots, use
PLENTY OF TENSION. If you don’t, the body
looks really loose, and there won’t be
enough room at the front of the hook to
finish the fly.
5. Tie in the wing material, length
extending back to the butt of the fly. Tie
it in at the point where the body material
cords were tied down and then wrap thread
firmly toward, but not to the eye of the
hook. Cut off the winging material piece
extending forward and save for more wings.
(use about a 6” piece - it’s easy tie in the
correct length and then trim the forward
portion. A 6 “ piece will tie a bunch of
wings.)
6. Separate wing material into 2 equal
halves and pull these laterally to the sides
of the fly. I use a fine pair of tweezers
for this, but a needle does fine.
7. Tie in about a 6” piece of Head/Thorax
material - tie it in backwards to wing butts
and on the side of the fly.
8. Fold Swiss Straw forward between wings to
keep them separate, and tie down the Swiss
Straw firmly from the wing butts almost to
the hook eye. Trim to leave a small shelf of
material pointing forward. Save the
remainder of the Swiss Straw for more wing
cases.
9. Wrap head/thorax material forward, 3-5
wraps depending upon how much space you
have. After the last wrap, pull the material
under the hook shank, tight into the eye of
the hook and give it a couple of good thread
wraps. Do not cut it.
10. At this point there is going to be some
Swiss Straw visible, so tho finish the head
neatly, first cock the fly at about a 45
degree angle in the vise. Bring the
head/thorax material backward with the left
hand and start building up the head with 6
wraps of thread. This will not only secure
the head/ thorax material, but will give a
neat head on the fly.
Right Column Box
Headline
Hours:
O
P E N
O P E N
O P E N
We're here 24/7
It's going to be an exciting year! More items coming
in every day.
If you don't see what you wish, be sure to ask, I am glad to
special order items for you (and maybe carry them) just because YOU
ASKED!
My warmest welcome to my customers....I'm so glad you
stopped by. Be sure to grab a cookie as you shop....mine have no
calories! :)
Would you like to open a web store? Don't get stuck with a
solution that controls you. Ask and I'll direct you to an
easy, fun and reasonable solution!