 |

Ideas
This page is reserved for examples of great projects
you can do with your materials.
I will be having monthly crafting contests with the
winner receiving more crafting items!! YIPPEE!
|
|
|
Amanda
Jane Pleater
Instructions for the Super Amanda (Same for all models)
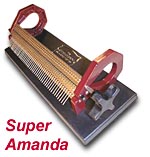 |
The SUPER AMANDA smocking
pleater is superior in design and workmanship to
similar products and we, the manufacturers, are
confident you will be satisfied and proud of your
purchase. It is our aim to assist you in the
production of your beautiful pleated garments.
You will find the SUPER AMANDA both smooth and
simple to use, with replacement parts readily
available. We wish you every success and many hours
of smocking pleasure with your new investment. |
We have kept our
instructions as brief as possible, as we are
confident that when you become familiar with your
machine, you will soon utilize your own skills and
expertise to your full potential.
The SUPER AMANDA smocking pleater requires little
maintenance.
Needles may be replaced by removing Left and Right
Hand Locating Pins which hold the Top Front Roller
in place. Roll out the roller and place the needles,
point first, into the appropriate locating needle
grooves. Replace the Top Front Roller, and
re-install the locating pins.
|
For fine smocking the needles need
to be kept in every groove of the machine or for the
width of the fine smocking being done.
For normal smocking, it is recommended that 24
needles are left in place at the 10mm width spacings.
(Every second groove) or for the width of smocking
being done. |
|
PLEATING PREPARATION
|
- Check that all needles to be used are
correctly in place. If there are any needles
that are bent or are incorrectly placed, remove
them according to the directions above, and
replace.
- Thread the required number of needles to be
used with a strong gathering thread.
The threads should be of sufficient length to
allow tying off on completion of the pleating
operation.
- Some operators may find it advantageous to
use different coloured threads to make it easier
to pick up smocking points.
If it is desirable to elasticise a garment, use
shirring elastic instead of threads.
- It is advisable to thread two or more
needles than the actual number of rows required.
This holds the first and last rows more evenly,
and can be used as a guide for sewing on the
yoke.
|
|
FABRIC PREPARATION
|
- Original fabric width should be
approximately three to four times the width of
required pleated product (depends on weight of
fabric).
- Wash new fabric to remove sizing: stiff
fabric should be ironed with a damp cloth.
Remove selvages from any fabric thicker than
batiste.
- Place the fabric smocking side up on the
table, attach it to a dowel stick (alternatively
a plastic coated curtain rod). Roll the fabric
smoothly and evenly onto the rod.
- Do not cut out armholes or neckline until
smocking is completed - preferably, mark to
outline of where the cut will occur, and smock
to the mark.
|
|
PLEATING
|
- Insert the rolled fabric into the back of
the pleater and ensure straight tracking.
- It is normal to insert the amount of fabric
to be pleated from the left hand end with
unpleated (and therefore unmarked by needles)
fabrics protruding on the left. Avoid bunching
of unpleated fabric by assisting the feed
through the left hand upright whilst pleating
the required section. Failure to do this can
result in bunching of the fabric and consequent
needle breakage.
- Feed the fabric squarely between the two
back rollers and turn the knob slightly to just
catch the fabric. If the fabric is off grain or
puckers, reverse the knob to release the fabric
and start again.
- DO NOT REVERSE
THE KNOB AFTER THE FABRIC IS ON THE NEEDLES.
- When the needles are full of pleated fabric,
ease it gently on to the threads. Do not feed
more fabric through until the needles have been
cleared. The pleats will stay more even if they
are kept drawn together.
- When all fabric has been pleated, cut the
threads close to the eyes of the needles, and
knot them at the required length of your
completed smocked section.
- Clean the rollers of any threads and dust in
preparation for later use.
|
|
HANDY HINTS
|
- If in doubt about the ease with which a
fabric will pleat, test strip of both washed and
unwashed fabric before you start. Don't rush
into any pleating until you are confident.
- Be sure to remove the adhesive tape (or
equivalent) before feeding the last of your
fabric through the machine - pleated tape is
both difficult to unpick, and does not feed
through easily.
- If you are not pleased with your initial
product, pull out the pleats and start again -
the extra effort and time taken is well worth
while.
- When the pleater is not in use, cover it and
store in a dry place - remember the needles may
rust. You may even prefer to remove them and
store in a moisture proof container.
- Your machine will
give you years
of service.
|
|
|
|
Right Column Box
 |
|
|
Headline |
|
|
|
Hours: O
P E N
O P E N
O P E N
We're here 24/7
It's going to be an exciting year! More items coming
in every day.
If you don't see what you wish, be sure to ask, I am glad to
special order items for you (and maybe carry them) just because YOU
ASKED!
My warmest welcome to my customers....I'm so glad you
stopped by. Be sure to grab a cookie as you shop....mine have no
calories! :)
Would you like to open a web store? Don't get stuck with a
solution that controls you. Ask and I'll direct you to an
easy, fun and reasonable solution!
|
|
|
|
|
