Blue Top Navigation
Home Categories Search Products Ideas View Cart Contact Us   Home Search Contact Us


Beading & Jewelry

Clay & Sculpey

Cooking & Home

General Craft Items

Gifts

Metal Working

Paint & Crafts

Paper Crafts

Quilting

Sew. Knit, Crochet & Needlework

Scrap booking

Stamping - Embossing

Wood Burning

New Items


Ideas

This page is reserved for examples of great projects you can do with your materials. 

I will be having monthly crafting contests with the winner receiving more crafting items!! YIPPEE! 


Punch Maintenance

When punches are new, be sure to 'break them in' by punching without paper first to loosen the punch.  When it works well, move on to paper. 

Did you know that if you punch metals (aluminum foil) it will help 'sharpen' your punches?  It does!  I've also found that old "waxed paper" works well to lubricate your punch.  Waxed paper is also great to run your hot iron over....it will make your ironing    g..l..i..d..e    and so much easier! 

If your punch jams in the down position, a firm rap on a flat surface will usually release it.  It's not a 'slam' but a pretty solid rap.  It sounds awful, but it works! 

When all else fails, you can always remove a jam by taking your punch apart.  That's right, it isn't hard to do, and it isn't broken! 

If you have been punching lots of adhesive paper, the punch can get gummed up.  The easiest way to fix it, is to take it apart, clean with a solvent to remove the sticky residue.  Undo works great!  Don't have any?  Alcohol is a good substitute.

First, note the slot at the "A" positions in the diagram.  If you take a small screwdriver and look at the underside of your punch, you can put the small screwdriver in the slot and it will release the punch.  Sometimes one side will release both sides, and sometimes you need to repeat the process on the second side.  Some of the larger punches have three slots, and you may have to repeat in the third slot.

You can see the punch has few parts:  The cover or housing, the button, the die cutter, the spring and the base. 

When you have cleaned out the jammed paper, clean if necessary, and reassemble.  Be sure to note the slot at "B" in the diagram on the button.  Line them up with the die cutter and place together.  The housing will 'snap' on and hold the entire punch back to normal.  

You can always use a punch lubricant, like "the Punch Doctor" to keep your punches easy to use.

Once you've taken one punch apart, you'll be amazed how easy it is...and how just about every punch, works the same.  You will never again be frustrated with a jammed punch!

Fiskars, McGill, Emagination, The Punch Bunch, CarlaCraft, EK Success, it doesn't matter, the principle is the same.  Sometimes there is a variation of where the slot is to start, but after that, they are basically all the same! 

I hope this information saves you the frustration when punches stop cooperating! And you can get back to punching happily ever after!


Right Column Box

Headline

 Hours:

O P E N
O P E N
O P E N

We're here 24/7


It's going to be an exciting year! More items coming in every day. 

If you don't see what you wish, be sure to ask, I am glad to special order items for you (and maybe carry them) just because YOU ASKED!   

My  warmest welcome to my customers....I'm so glad you stopped by.  Be sure to grab a cookie as you shop....mine have no calories!  :)

Would you like to open a web store?  Don't get stuck with a solution that controls you.  Ask and I'll direct you to an easy, fun and reasonable solution!
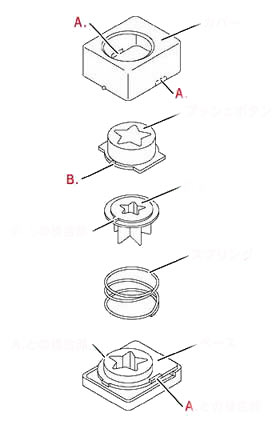
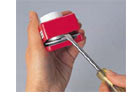


Blue Bottom Navigation

t Privacy   t