 |

Ideas
This page is reserved for examples of great projects
you can do with your materials.
I will be having monthly crafting contests with the
winner receiving more crafting items!! YIPPEE!
|
|
|
Idea Page
|
Kreinik Thread
|
My Own Little Mermaids
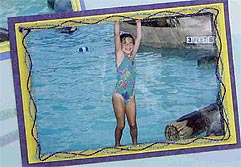
By Treasure It
Skill Level: Beginner
Embellish the swimsuits with double-sided
Treasure Tape™ and clear Beadlets—they’ll
glisten like real, wet suits!
Materials needed:
• 12” x 12” paper in a blue swirl, to replicate
water or waves
• three photos of your child swimming
• blue, yellow, aqua, purple cardstock
• 1/4” Treasure Tape™
• 4” x 6” sheet of Treasure Tape™
• Diamond Beadlets®
• Kreinik 1/16” Ribbon 054F Lemon Lime
• Kreinik Tapestry #12 Braid in 026 Amethyst,
091 Star Yellow, 014HL Sky Blue Hi Lustre
• Shallow pan or tray
• tracing paper or clear template plastic
Instructions:
1. Cut yellow and aqua cardstock 1/4” larger
than your photos. Mount photos in the center
using scraps of Treasure Tape™.
2. Cut one more piece of yellow cardstock, plus
the purple and blue cardstock, 1/4” larger than
the photo/cards you just made. Mount your
photo/cards in the center of these.
3. Lay 1/4-inch Treasure Tape around the border
of each photo, overlapping onto the inner
cardstock. Remove the red liner to expose top
sticky part.
4. Lay Kreinik 1/16” Ribbon and Tapestry Braid
in swirl patterns on this tape. Use our photo as
a guide, or create your own designs.
5. Lay each photo in the pan and cover remaining
sticky areas with Diamond Beadlets.
6. Lay tracing paper or plastic over each photo
and trace bathing suits. Cut out. Lay this
template on the sheets of Treasure Tape™ and cut
out the bathing suit shapes following your
template.
7. Remove white backing from the tape shapes,
and lay on each photo, covering the bathing
suits.
8. Remove red liner to expose sticky part, lay
photos in your pan and cover with Diamond
Beadlets.
9. Mount photos on background paper as desired,
adding date and captions.
Option: we laid Treasure Tape on the swirls of
the background paper, removed the tape’s red
liner, and covered with Diamond Beadlets.
Thinking of You card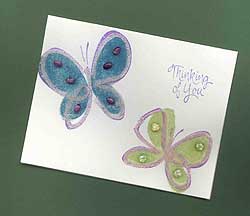
Designed by: Dena Lenham
Skill Level: Beginner
Materials needed:
• Kreinik Iron-on 1/8" Ribbon 6500
Hydrangea, 6100 Carnation
• 4" x 6" sheet of red liner Treasure
Tape™
• Diamond Beadlets
• shallow tray or pan
• white cardstock, cut 8.5" x 5" and
folded in half to form a card
• white envelope
• Butterfly rubber stamps ("Bold
Butterfly" by Stampin' Up, or similar)
• "Thinking of You" rubber stamp
• Lilac or purple stamp pad
• Leaf green stamp pad
• flat-backed purple and green beads or
cabochons
• Clover Mini Iron or household iron
• Kreinik Teflon Press Cloth
1. Turn your iron onto the highest heat
setting and let it heat thoroughly.
2. Meanwhile, stamp "Thinking of You"
and your butterflies on the front of
your white card using the purple and
green stamps.
3. Outline each butterfly, following
your rubber-stamped lines, with the
Iron-on ribbon, using 6300 Hydrangea on
one butterfly, and 6100 on the other. To
do this, lay the thread at a starting
point, cover with the Teflon Press
Cloth, and press with the hot iron for
several seconds until the thread
adheres. The Teflon keeps the adhesive
in the thread from sticking to your
iron.
4. Stamp the butterfly shapes on the
white side of the Treasure Tape sheet.
Cut out.
5. Remove the tape from the white
backing and lay onto the butterflies on
your card.
6. Remove the red liner to expose the
top sticky area. Attach cabochons in
desired places. Lay the card in your pan
or tray and cover the sticky area with
the Diamond Beadlets.
Beaded Button Box
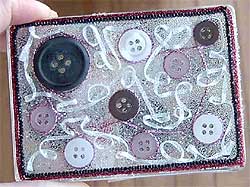
Designed by: the Discount Diva
Skill Level: Beginner
Check out the sewing supplies at your
local dollar or discount store. We found
this cute button box that can be
embellished by you or your child, and
given to a sewer as a gift (inexpensive
and FAST!).
Materials needed:
• button box from a discount store
• 4" x 6" Treasure Tape sheet
• Diamond Beadlets
• buttons to embellish the top
• Kreinik 1/16" Ribbon in desired colors
(we used 100 White)
• Kreinik #12 Braid in desired colors
(we used 031 Crimson and 007 Pink)
• Kreinik Facets in desired colors (we
used Black)
• shallow pan or tray
Instructions:
• Trace the outline of your box top onto
the white side of the red liner Treasure
Tape. Cut out.
• Remove the white liner and place the
tap on the top of your button box.
Remove the red liner to expose the
sticky part.
• Decorate with any buttons first,
placing them randomly or in a particular
pattern onto the tape.
• Next, lay the thread in desired
places. Lay the Facets around the edge
as a border, then swirl and curl and lay
the other colors as desired, pressing
into the tape to adhere the threads.
• Then lay the box in a shallow pan or
tray and cover all remaining sticky
areas with the Diamond Beadlets.
|
|
Rainbow Flip Flops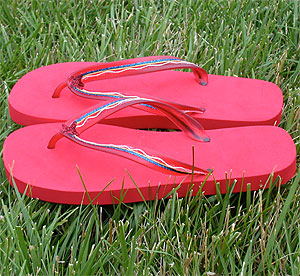
Designed by: Amy Law
Skill Level: Beginner
Materials needed:
• one pair of flip flops (target)
• 3/4” treasure tape
• scissors
• Treasure It Diamond Beadlets
• Mrs. K’s Dimensional Thread: #16 Braid 092,
1/8” Ribbon 015, #12 Braid 012
Instructions:
1. Apply your 3/4” tape in two strips to cover
the entire top of the plastic straps. Trim to
the edge if necessary.
2. Peel back the red liner from both sides.
3. Beginning as close to one end of the strap as
possible, use the 015 thread to create a border
along the top and bottom of the strap. Add a
second border inside the green using your pink
thread.
4. Begin in the center of the strap and create a
flower using your purple thread. make a loop
with the thread and press it down. Make a second
loop opposite the first, and press it down as
well. Make two more loops to form the flower.
Continue these steps along both sides of the
straps until you have a row of flowers on each
side.
5. Place your flip flop in a ziploc bag or a
shallow tray, and pour Diamond Beadlets over the
exposed tape. Tap gently to remove excess
beadlets, and your new flip-flops are ready to
wear!
Beaded
Prom Shoes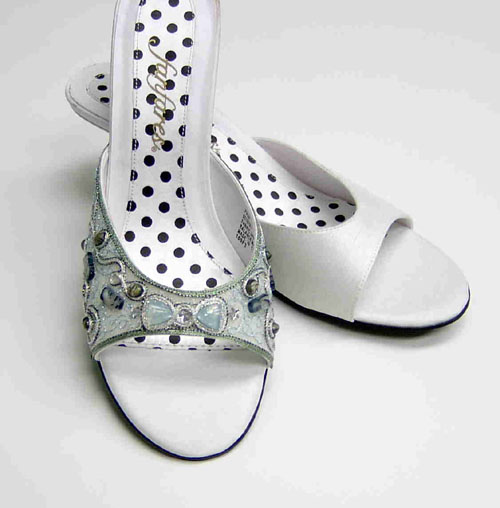
Designed by: Amy Law
Skill Level: Beginner
Dance the night away in these
beautiful embellished shoes. You'll look like a
million dollars - but only you will know that
you simply embellished a plain pair of discount
shoes with beads, tape and Kreinik metallic
thread.
Materials needed:
- 1" Treasure Tape
- flat-backed beads or cabochons
- Kreinik 1/8" ribbon in color 086C
- Kreinik #12 Braid in color 5009
- Kreinik #32 Braid in color 3231
- Kreinik #4 Braid in color 014
- Diamond Beadlets
- shallow pan or tray
- white dress shoes
Instructions:
1.First, apply your tape to the shoe. Beginning
on one side of the toe, apply your tape across
the shoe and trim even with the sole. Repeat
this process, adding strips of tape until the
entire toe area is covered.(If some strips do
not lie as flat because of the curve of the
shoe, this is ok- when you remove the liner, you
can even out the tape and it will not be
noticeable) Press along your tape to smooth out
any air pockets and make sure the tape adheres
firmly.
2. Peel the red liner off your shoe. (You
can peel off all of it at once and work your
design as a whole, or you can peel a little away
at a time, and work on the parts of your design
one at a time.) Begin your design by arranging
your cabochons on the tape. Press firmly to
adhere them.
3. Next, apply the Ribbon to the top and
bottom edges of the shoe, to create a border
around your design.
4. With the #32 braid, create your main
design. We used the cabochons to guide the
shape of our thread design. Once the main
design is done, use the #12 to outline the
design.
5. Using the #4 braid, fill in between the
main areas of your design.
6. Using a piece of the red liner to protect
the tape from your fingers, press firmly along
the threads in your design to make sure they
adhere. Place the shoe in a container or
ziplock bag and pour Diamond Beadlets over the
exposed tape areas. Tap the shoe gently to
remove excess beadlets.
Repeat this process with your second shoe,
and your personalized pair is ready for dancing.
|
|
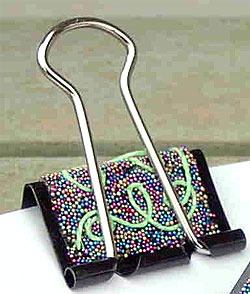
- Embellished
Binder Clips
-
- Design by Dena
Lenham
- Skill Level:
Beginner
Materials needed:
- medium sized binder
clips from an office supply
store
- Kreinik metallic braid
any color* *(we used #12
Braid 053F)
- red-liner, heavy duty,
double stick tape* (we used
1" Treasure Tape)
- micro seed beads* (we
used gold, blue, pink)
- shallow pan or tray
Instructions:
|
|
|
|
|
|
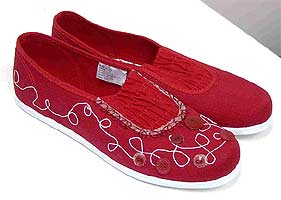
Grandma's Ruby Slippers
Designed by Dena Lenham
Skill Level: All
If you want to dress up as Dorothy for Halloween, but
need more comfortable shoes, never fear: take a plain
red pair of anything, and decorate it. You can put the
sparkling ‘ruby’ touch on any shoe using beads, tape and
thread.
Materials needed:
• red tennis shoes
• Kreinik Iron-on #16 Braid in 6010 Pearl (or go all red
with 6130 Red)
• Kreinik Teflon Press Cloth
• Mini Iron or household iron
• 1/4” Treasure Tape™
• Diamond Beadlets®
• Kreinik #12 Braid 061 Ruby
• Red buttons
• Treasure Tape™ dots
• shallow pan or tray
Instructions:
Click here to download the FREE instructions for this
design. You will need the FREE program Adobe
Reader to view and print this file.
|
 |
|
Twisted cording using 4 colors
Designed by: Kreinik staff
Skill Level: Beginner
Enlist three of your friends to help you make
4-color twisted cording for friendship bracelets or
piping on projects like stockings and ornaments. You
can choose your own colors and match your cording to
designs or outfits. Remember-use this simple
formula-The more friends, the more stripes!!
Materials needed:
- 4 colors of Kreinik Heavy #32 Braid, 1/8"
Ribbon, or Medium #16 Braid or for finer cording
use #4, #8,#12 or even Serica silk
-
Kreinik Custom Corder with weight
- 3 friends to help you
Instructions:
1. Measure your project to determine the length
to make your trim. Multiply that measurement times
3 to determine the total length of thread you need
to cut in order to complete your trim. Cut each
color that length. (i.e. for 12" trim you need four
36? lengths of thread).
2. Take one of your thread colors and tie the
ends together; this forms a loop. Loop a second
thread through the first loop and tie the ends of
that thread. Have friend #1 stand opposite you and
hand that person the second loop which should now be
attached to the first loop.
3. Take the thread you are holding and slip the
knotted end onto the hook of the Corder. Note: the
knotted ends should always be the portion of the
loop on the outside. This way it will not become
part of the trim.
4. Begin twisting with the Corder. When the
thread becomes so tight that it almost begins to
kink, stop winding. Carefully remove the thread from
the Corder, holding it tightly, and hand the end to
friend #2 to hold securely.
5. Now drape another thread around the center of
your twisted threads and tie the new thread's ends
together. Insert the knotted end of the new looped
thread onto the hook of the Corder, and begin
twisting until the third thread is twisted tightly.
Now let friend #3 hold that end securely.
6. Drape the fourth thread over one of the
twisted threads at the intersection of your three
threads and make another loop by knotting the ends.
Loop the knot onto the hook of the corder and begin
twisting.
7. When this fourth thread is twisted tightly,
place the weight that comes with the Corder in the
center where all of the threads intersect. Carefully
collect the ends holding them together with one hand
while keeping the tension on the threads by pulling
down on the weight with your other hand. When all of
the threads are held together and aligned at a 90
degree angle to the floor, release the weight. The
threads will naturally twist forming your cord. You
have now made a 4-stripe corded trim for your
project.
- Tip 1: If you want the cording to be
thicker, use more than 1 strand of each color.
- Tip 2: You can add more stripes. You just
need more friends.
- Tip 3: Beads or charms are easy to slide
onto the threads before twisting.
- Tip 4: It is easy to make faux jewelry with
the corder.
- Tip 5: This is a ?kid tested? product. They
love it.
- Tip 6: Easily make belting for sweaters.
- Tip 7: Blend different types of threads to
make interesting purse handles or straps.
- Tip 8: Make decorative cords for lanyards.
|
|
|
|
Right Column Box
 |
|
|
Headline |
|
|
|
Hours: O
P E N
O P E N
O P E N
We're here 24/7
It's going to be an exciting year! More items coming
in every day.
If you don't see what you wish, be sure to ask, I am glad to
special order items for you (and maybe carry them) just because YOU
ASKED!
My warmest welcome to my customers....I'm so glad you
stopped by. Be sure to grab a cookie as you shop....mine have no
calories! :)
Would you like to open a web store? Don't get stuck with a
solution that controls you. Ask and I'll direct you to an
easy, fun and reasonable solution!
|
|
|
|
|
